Budgeting made simple – See your finances in one column
270
views
Individual personal budgeting using a clear approach helps bring your finances in to focus. It’s that initial effort to establish your best method that can be the most time consuming. . .until now. In one evening, you can assemble a spreadsheet that reflects your personal expenses and final savings.
The pressure of knowing your finances is not pressure that has to exist in your life, because numbers are just that . . . numbers.
When you control your numbers, verses your numbers controlling you, your quality of life can be taken to a whole new level of understanding, and reception.
loading...
Wth the advent of the spreadsheet, people’s lives and the work of business changed. It was made more efficient, and simpler.
For purposes of presenting one personal budgeting approach, now might be a good time to be reminded that the spreadsheet isn’t just for business.
Anyone can become efficient and user-friendly with the one column approach to personal budgeting.
Through proper categorizing, adding (summation), and subtraction of your financial numbers, the money from income will fit a structure in your life that:
1. You have planned
2. You have designed
3. You have determined represents your way of life, and future plans.
loading...
Using a spreadsheet (i.e. Excel. Used with permission from Microsoft), it can only take one column to make your day-to-day personal finances clear, complete and positioned for savings, and possibly, growth.
Note: Before putting in your final numbers for your expenses and savings, I.e. mortgage payment, retirement savings, etc. validate what you need to put away based on your bill payment schedule, and can put away based on your age, current income, existing retirement savings as it pertains to future retirement savings.*
(*Do your own research, and check with your financial advisor, as you determine, for final confirmation of allowable retirement savings approaches based on your age, income, existing retirement savings, future goals, and any and all additional considerations, as s/he advises).
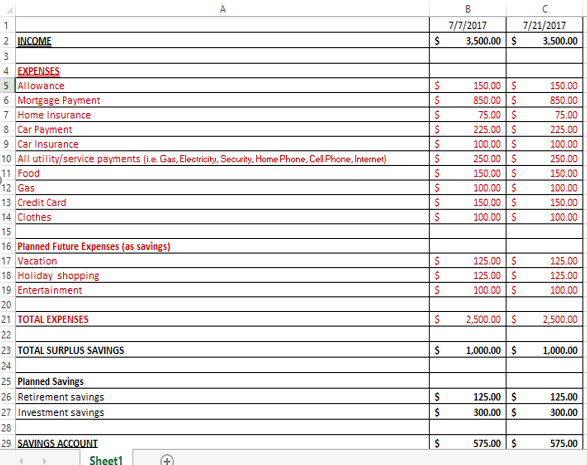
Please reference the diagram in this article as you follow these budgeting steps.
Let’s get started:
Step 1: Open a new, spreadsheet document.
Step 2: Stretch the first column (Column A in your spreadsheet) to the desired width to accommodate categories by clicking on the vertical line to the right of Column A, holding the key, as you see the arrows, pull the vertical line to the right for the desired width.
Note: You’re stretching to accommodate enough space for your budget categories to be typed in.
Step 3: Stretch the second column (Column B in your spreadsheet) to the desired width to allow for dollar signs and numbers using the same technique as in Step 2.
Note: You’re stretching to accommodate enough space for the dollar amounts of your income, expenses and savings.
Important preparation step: Click the “B” in column B so it highlights the column in its entirety. Go to the Home tab. Go to the Number category to the right side of the Home tab. On the dropdown, select “Accounting”, then take your cursor and click on the currency sign for your region of the world.
{E.g. $, English (United States), £ English (United Kingdom), € Euro (123), ¥ Chinese (PRC)}
Your columns are now ready for the numbers that you’ll be putting in.
Step 4: Save Your File with the desired name for use, and re-use (e.g. MY BUDGET, 2017) on both your computer, and on a backup device (e.g. USB flash drive).
Step 5: List “Income” as a category in Row A2.
- Important note: This will be one column representing a pay week, bimonthly, or monthly pay check. You will need to establish what that first column is based on your pay schedule. Then, you can stretch your work across multiple columns to take into account future pay periods.
Step 6: List “Expenses” as a category in A4, and then, list all your expenses spelled out as categories in individual rows in Column A under A4. This is specific to your lifestyle.
- Save your file.
Step 7: List “Planned Future Expenses (as savings)” as a sub-category under “EXPENSES”. The list of planned expenses under this category will be in addition to the expenses listed previously under “EXPENSES”. These are actually savings for future planned expenses.
Step 8: Add your all your expenses together and present in a final category for expenses, “TOTAL EXPENSES”. It should be a formula that adds all the expenses listed. The following is a formula to insert in column B next to this category, =SUM(B5:B19).
- Save your file.
Step 9: Put in a category for “TOTAL SURPLUS SAVINGS” and subtract your total expenses from your income using the following formula as an example, =B2-B21.
- Save your file.
Step 10: Put in your “Planned savings” as categories. These can be such items as retirement monies, college fund(s), and personal investments.
- Save your file.
Step 11: List “SAVINGS ACCOUNT”. This final number is what you will have added in to your savings each pay period. Here’s its formula, =B23-B26-B27.
- Save your file.
Step 12: Fill in multiple columns for a one-month projected paycheck schedule. Now, you can stretch your budget amounts across multiple columns based on repeat and projected expenses, and, most importantly, you’re upcoming paycheck schedule.
To do this click on Column B, and then highlight across as many columns as you want to fill these same numbers across (e.g. B and C for a one month, bi-monthly pay schedule).
Go to the Home Tab, then Editing Tab, and click “Fill” and select “Right”.
All the dollar numbers you just created will fill to the right; then you can type in the upcoming pay week/pay period at the top of the Column to coincide with the expected check.
Step 13: Finalize your budget by highlighting B1 and C1, go to the Home Tab then the Number Tab, and select Short Date from the dropdown. Fill in the calendar date you’ll receive each paycheck, (e.g. 7/7/2017, 7/21/2017).
Save your file.
Optional last steps:
1. To further discern expenses from income and savings, highlight all the expense categories including headings and numbers, go to the letter color on the font category found on the Home Tab, select a color for your expenses, (e.g. red).
2. Highlight the word, “EXPENSES”, go to the Font Tab and select double underline.
3. Highlight your income and savings categories each, one step at a time, with their dollar amounts, go to the letter color on the Font Tab found on the Home Tab, select a color for your income and savings, (e.g. black).
4. Highlight the word, “INCOME”. Go to the Font Tab and select double underline. Do the same with the word “SAVINGS”.
5. Making your categories flush left, centered, and/or flush right, is your preference.
6. Save your file.
You’re done. Congratulations! And remember, always save your file.
Personal budgeting doesn’t have to be cumbersome, or an unclear picture restricted to just the current numbers in your checkbook. Done once, the budgeting tool you create is ready for your use at all times. Updates and changes will be as your budgeting picture changes.
Loading...